Welcome to the new Mariopedia!
Kremkroc Industries Inc.
| Kremkroc Industries Inc. | |
|---|---|

| |
| General information | |
| Located | Kong Island |
| Levels | 7 (6 regular, 1 boss level) |
| Appearances | |
| First appearance | Donkey Kong Country (1994) |
| Latest appearance | Donkey Kong Country: Tropical Freeze (2014) |
| Navigation | |
| Previous | Gorilla Glacier |
| Next | Chimp Caverns |
Kremkroc Industries, Inc. (also known as Factory)[1] is a Kremling industrial base commanded by Klump located on forehead of the Kong Island which was the fifth location in Donkey Kong Country and seventh location in Donkey Kong Country Returns.[2][3]
Architecture
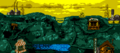
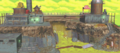
In outside, the industrial zones consist of sheds with silos and chimneys together. Inside on warehouse, there are a huge number of pipes, gears, chains and pendant lights.
The place where the factories are built consists of mines, cave and pond. With the expulsion of the Kremlings, vegetation is seen growing on the buildings and several trees showing that this industrial zone has been decommissioned for a long time.
History
Background information
Before the presence of the Kremling Krew, this terrain had all life and vegetation. The factories began their construction when half of the Kremling Krew supervised by Klump were sent by K. Rool to Kong Island.[2][4] During operation, skies were polluted by smoke from chimneys, entire vegetation dies due to land sterilization and a pond was poisoned.[5] This industrial base is also the heart of the mining network spread across the mountain.[6]
Donkey Kong franchise
In Donkey Kong Country, this industrial zone was invaded by Donkey Kong & Diddy Kong as the fifth location in the quest to reclaim the Banana Hoard. Here the duo had to escape the traps guarded by Klump where they had burning oil drums, walking on the conveyor platform, jumping on coal elevators, swam in a poisoned lake full of mincers, jumped from cart to cart, risked a blackout and had the battle against Dumb Drum to retrieve the fifth banana.
In Donkey Kong Country Returns under the name Factory, it was reactivated by the Tiki Tak Tribe to create an army of Tikis with bananas from hoard. It was explored by the duo for the second time as the seventh location of the journey to recover the bananas from hoard where they had to clean up the air, passed through the crushers, took the risk of producing at full steam, dodged dangerous machinery on a rocket trip, turned on a generator each in the 3 holds to activate a rocket and had the seventh battle against Cordian to free Colonel Pluck from his control.
In Donkey Kong Country: Tropical Freeze, the factory became the seventh stage of the sixth location and covered in ice with rest of Kong Island. Here was also revealed in this game the power generator that runs the whole factory.
Stages
| Donkey Kong Country | |||
|---|---|---|---|
| Stages | Description | Enemies | Animail Friends |
 Oil Drum Alley |
As the name implies, the entire factory is full of burning oil drum and has some that put out & light up.
|
Gnawty Kritter Manky Kong |
Rambi |
 Trick Track Trek |
The pair travels on the scaffolding with a motorized platform and several enemies on top wait to attack.
|
Necky Mini-Necky Gnawty Zinger Kritter Klump Klaptrap Manky Kong Krusha |
None |
 Elevator Antics |
Coal bucket elevators are in full operation in the caves. It will be very important for the pair to do a roll and jump together.
|
Slippa Mini-Necky Zinger Klump |
None |
 Poison Pond |
The duo swims in a polluted green lake where they encounter various obstacles. In place of the Croctopuses that always appear in underwater levels, a number of mincers appear that block every corner and are also invulnerable to Enguarde's attacks. | Bitesize Chomps Jr. Squidge |
Enguarde |
 Mine Cart Madness |
Unlike Mine Cart Carnage, the pair jumps off the mine carts and the Kritters above them are stationary at each end of the line.
|
Gnawty Necky Zinger Kritter |
None |
 Blackout Basement |
Klump's main factory is having fuse problems, so the pair will have to stay put when there's a blackout.
|
Kritter Klump Klaptrap Manky Kong |
None |
 Boss Dumb Drum |
The pair will have to dodge the amount of impacts from Dumb Drum and fight the creatures summoned by him until he self-destructs. | Kritter Slippa Klaptrap Klump Army |
None |
| Donkey Kong Country Returns | ||
|---|---|---|
| Stages | Description | Enemies |
 Foggy Fumes |
The second silhouetted level on smokescreen of factories. Some collectibles are covered by smoke and the pair will need to blow or stand in the middle of the smoke.
|
Tiki Goon Tiki Zing Tiki Buzz Pogobot |
 Slammin' Steel |
After eliminating air pollution, the pair find a variety of crushers are around every corner.
|
BuckBot Electroid |
 Handy Hazards |
The entire stage is operated by a robotic eye. But first, the pair need to buy a Cranky Kong key to unlock this level.
|
Pogobot Tiki Buzz BuckBomb |
 Gear Getaway |
The pair goes on a rocket ride where they have to dodge gears of various sizes, crushers and machinery.
|
Tiki Buzz |
 Cog Jog |
This is the first basement where the pair must activate the generator. As the name implies, various structures are then linked and moved by gears.
|
Tiki Buzz Pyrobot Pogobot Tiki Bomber |
 Switcheroo |
This is the second basement where the pair must activate the generator. Here it is complete with red and blue blocks on the walls, which can be activated one at a time by a round switch depending on which color is touched.
|
BuckBomb BuckBot Pyrobot Electroid |
 Music Madness |
This is the third basement where the pair must activate the generator. Huge drums and cymbals are played in time with the music of the stage, and even the devices work in time with the music too.
|
Tiki Buzz BuckBomb Pyrobot |
 Lift-off Launch |
After activating the 3 generators where the rocket appears, the pair enters it to reach the main factory. | None |
 Treacherous Track |
The duo needs to touch the lights to mount rails in a hurry, otherwise the platform will fall without return. For that, you have to complete the letters KONG in all the phases of the place.
|
Tiki Goon Pyrobot Tiki Buzz |
 Feather Fiend |
In this battle, the pair must sabotage Stompybot 3000 by pulling the green chains and completely defeat Colonel Pluck (who is being controlled by Cordian). | BuckBot |
Profiles
Donkey Kong Country
- SNES instruction booklet (page 20): The Kremling's crowning industrial achievements are the huge factories they built in Donkey Kong Country. These factories do not adhere to strict safety codes, and are full of burning oil drums, faulty lighting and perilous platforms. Enter at your own risk.
- SNES Player's Guide (page 88): Welcome to the wastelands. This area of the island, once lush and overgrown with island greenery, has been stripped of all its natural beauty. Instead, smog clouds the air and there is a general lack of greenery. King K. Rool and his factories are to be held responsible for polluting the place. The levels of toxicity are high, so don't spend more time than you have to in this slimy area there are many Items hidden in the factories.
- GBA Prima Official Game Guide (page 116): Kremkroc Industries has many fiendish traps, mainly encompassing visual tomfoolery (such as blackness and jumps of faith) to provide the challenge. There's only one way through these levels, but a lot is hidden along the way, and it takes incredibly fiendish methods to enter all of the Bonus Levels. That K. Rool is one cruel customer!
Donkey Kong Country Returns
- Prima Official Game Guide (page 21): The seventh world on the island is the Factory. It is a dangerous place. Some areas are so smoggy you can hardly see. In addition to the mechanical enemies such as BuckBots, Pyrobots, and Pogobots, the machinery in the factory is also a threat to your health. Watch out for mechanical hands and pistons that can flatten you if you are not careful. Since the factory has tall ceilings, always look up high for items and collectibles.
Gallery
Donkey Kong Country (GBC)
Donkey Kong Country (GBA)
.png)
.png)
.png)

Names in other languages
- Kremkroc Industries Inc.
| Language | Name | Meaning |
|---|---|---|
| Japanese | レベル5 カントリーファクトリー Reberu 5 Kantorī fakutorī |
Level 5 Country Factory |
| French | Kremkroc et Kompagnie (SNES) Kremkroc s.a.r.l. (GBC) |
Kremkroc Kompany Kremkroc Ltd. |
| German | Krimskrams GmbH (SNES) Kremkroc GmbH (GBC) |
Odds and Ends LLC Kremkroc LLC |
| Italian | Kremcocco SpA | Kremcroc LLC |
| Spanish | Industrias Kremkroc |
- Factory
| Language | Name | Meaning |
|---|---|---|
| Japanese | ファクトリーエリア Fakutorī Eria |
Factory Area |
| French | Usine | Factory |
| German | Fabrik | Factory |
| Italian | Fabbrica | Factory |
| Spanish | Fabrica | Factory |
References
- ^ KynanPearson (August 12, 2021). Tweet by Kynan Pearson (archived). Twitter. Retrieved January 30, 2022.
- ^ a b Donkey Kong Country Player's Guide, Nintendo, 1994, p. 13 - "KLUMP: Klump is quite a character. He's like a big, overweight drill sergeant."
- ^ Nintendo Power trading cards - "KLUMP: Kommander Krem".
- ^ Nintendo Power Magazine Vol. 65, October, 1994, p. 20 - "BAD AND UGLY: Donkey Kong's Island has been overrun by the Kremlings."
- ^ Donkey Kong Country Player's Guide. p. 96 - "POISON POND: It's not bad enough that the waste from Kremkroc Industries Inc. has totally polluted the water, but that pollution breeds the kind of baddies that you just don't want to know about."
- ^ Kevin Bayliss on Twitter (retrieved on October, 19, 2019)
.png)